Compare Kitchen Thermometer Probe Types
A practical step-by-step guide to compare kitchen thermometer probe types, including preparation, instructions, common issues, tips, and next steps.
Compare Kitchen Thermometer Probe Types
Choosing the right kitchen thermometer probe comes down to matching the probe type to how you cook, what you cook, and how quickly you need a reading. This guide explains the common probe designs, what each one does well, where each one struggles, and how to test and care for a probe so your readings stay trustworthy over many meals.
Fast Answer
- For quick checks of thin foods, a thin needle-style probe responds fastest and leaves a small hole.
- For oven roasting and long cooks, a probe with a cable that stays in the food gives you continuous readings without opening the door.
Before You Start
- Decide which foods you check most often, such as steaks, roasts, poultry, bread, or candy, because each food rewards a different probe shape.
- Read the manufacturer documentation for any thermometer you already own to confirm which probe types fit its connector and temperature range.
- Gather a glass of ice water and a pot of boiling water so you can run a simple accuracy check before you rely on a probe.
- Clear a small workspace near the stove with a folded towel, a shallow dish of warm soapy water, and a dry cloth for wiping probes between uses.
Step-by-Step Instructions
Identify the probe designs you can buy
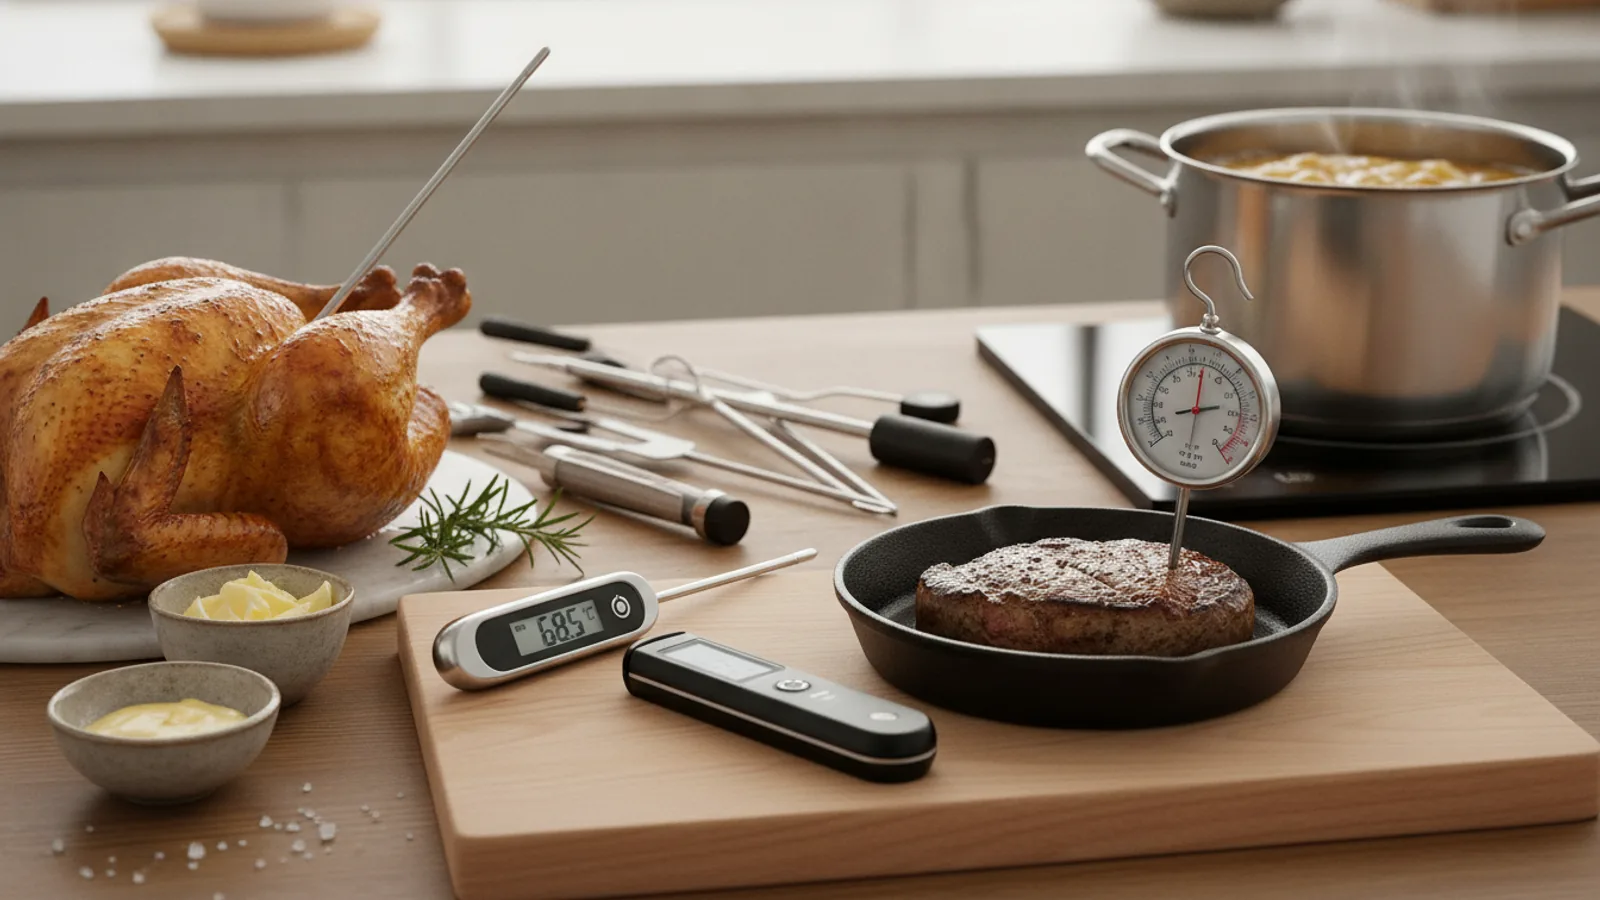
Start by learning the small set of probe shapes sold for home kitchens. A thin needle probe has a narrow metal shaft and responds quickly, which suits steaks, chops, chicken breasts, and other thin items. A larger penetration probe has a thicker shaft and holds more heat mass, so it suits roasts and whole birds. A cable probe connects to a base unit by a heat-resistant wire and stays in the food during cooking. An infrared surface probe reads heat radiating from a surface instead of inside food. A folding probe attaches to a pocket-style unit and folds away for storage. Write these names on a note and check what your existing thermometer accepts, because mixing probe styles that do not match your unit wastes money and gives you no usable readings.
Match probe mass to the food you cook
Probe thickness changes how fast you get a reading. A thin shaft heats quickly because it holds little metal, so it settles in a few seconds. A thick shaft takes longer to reach the food temperature but holds steadier readings in large roasts. For thin foods, a thick probe can pass through the item and touch the pan, which reads pan heat instead of food heat. For large foods, a very thin probe may bend or feel flimsy when you push it deep. Pick two probes if you cook both thin and thick foods: one thin and one sturdy. Then test each one in the same food and compare readings; if the two differ by a wide margin, one probe may be damaged or poorly seated in its connector.
Test accuracy before you trust a probe
Fill a glass with crushed ice and water, stir, and let it sit for a minute. Insert the probe without touching the glass, and confirm the reading settles near the freezing point. Next, bring a pot of water to a rolling boil and insert the probe into the water without touching the pot bottom. Check that the reading settles near the boiling point for your elevation, which is lower than at sea level. If a probe reads far off in either test, clean it, reseat the connector, and test again. When one probe passes and another fails, label the failing probe and stop using it for safety-critical cooking such as poultry. These two checks are simple, repeatable, and reveal a failing probe before it ruins a meal.
Compare response speed across probes
Response speed matters when you are cooking fast. Heat a small pan of water to a gentle simmer, then dip each probe into the water one at a time and count the seconds until the reading stops changing. Thin needle probes often settle fastest, cable probes vary by design, and thick probes usually take the longest. Record your counts on a piece of paper next to the probe names. Speed also depends on how deep you insert the probe and whether the food is still on the heat. A slow probe is not broken; it simply reacts more gradually. Match the probe to the task: use the fastest probe for quick pan-seared items and accept a slower probe for a roast that has plenty of time to reach temperature.
Check durability and cleaning needs
Look at how each probe is built. Sealed seams and smooth metal shafts wipe clean easily and resist moisture. Open seams, plastic collars, and folded hinges collect grease and can trap water. Read the manufacturer documentation to learn whether a probe is water-resistant or fully submersible, because many probes are splash-safe but not meant for soaking. A cable probe needs extra care at the joint where wire meets metal, since repeated bending there causes most failures. After each use, wipe the shaft with warm soapy water, rinse, dry, and store it straight rather than coiled tightly. For cable probes, loop the wire loosely. Cleaning habits matter because residue on a probe can insulate the sensor and slow its response, making a good probe behave like a poor one.
Choose a probe set for your kitchen
Bring your findings together and decide what to keep. If you cook mostly thin cuts, a fast thin probe covers most jobs. If you roast often, add a cable probe so you can monitor the middle of a large item without opening the oven. If you bake bread or make candy, confirm the probe range covers the temperatures you need, and check your thermometer documentation for its stated range. Keep one probe as a backup and label each one with tape so you can tell them apart. Store probes in a drawer or pouch where shafts stay straight and cables stay unkinked. Finally, repeat the ice water and boiling water checks at the start of each heavy cooking season, and retire any probe that drifts or reads inconsistently across repeated tests.
Quick Reference
| Situation | Action | Why it helps |
|---|---|---|
| You are searing thin steaks or chicken cutlets and need a fast reading. | Use a thin needle probe, insert it into the center from the side, wait a few seconds for the number to settle, and remove it before the food goes back in the pan. | A thin shaft heats quickly and leaves a small hole, so it gives a fast reading with little moisture loss in foods that cook in minutes. |
| You are roasting a whole bird or a large cut and want to avoid opening the oven. | Place a cable probe into the thickest part away from bone, route the wire through the oven door edge, set your target alert on the base unit, and leave the probe in place until the alert sounds. | A probe that stays in the food tracks the internal temperature continuously, so you open the oven only when the food is actually near its target. |
| You are making candy, custard, or bread and need to hold a steady temperature. | Confirm the probe and its base are rated for the temperatures in your recipe, clip or rest the probe so the tip stays in the liquid or dough without touching the pan, and stir gently to keep heat even around the tip. | Sugar and custard change structure at precise temperatures, so a probe that stays in place and reads steadily gives you a reliable window to act. |
Common Issues
- The probe reads a much lower or higher number than expected and jumps around.: Clean the shaft, reseat the plug firmly, and rerun the ice water and boiling water checks. If the reading still drifts, the sensor or cable joint is likely damaged, so label the probe as unreliable and keep it out of safety-critical cooking.
- The reading looks correct at first but slowly climbs during a long oven cook.: Confirm the probe and cable are rated for oven heat and that the cable is not resting on a hot rack or element. Route the wire over the door edge with a small fold of foil or a clip as a shield, and check the manufacturer documentation for the safe routing method.
- Thin foods read the pan temperature instead of the food.: Switch to a thin needle probe and insert it from the side into the deepest part of the food, keeping the tip away from the pan surface. Take a second reading a short distance away and compare, because agreement between two spots means the tip is truly inside the food.
Advanced Tips
- Calibrate by comparing readings across two spots in the same roast; a wide difference usually means the tip sits in fat or near bone rather than in the lean center.
- Use a probe's slow response to your advantage by taking a reading, waiting, and reading again, since a stable second number is more trustworthy than a single quick jump.
- Keep a small log of probe type, food, target temperature, and result for a few weeks, then review it to see which probe you actually reach for and which one you can stop replacing.
Final Checklist
- Confirm each probe's rated temperature range in the manufacturer documentation before using it in an oven or hot liquid.
- Run the ice water and boiling water checks on every probe you plan to use for poultry or other safety-critical cooking.
- Label probes with tape showing their best use and last check date, and retire any probe that fails repeated checks.
- Clean and dry each probe after use, store shafts straight and cables loosely looped, and inspect joints for cracks.
FAQ
How often should I check probe accuracy?
Check a probe before any safety-critical cook such as poultry, and repeat the checks at the start of a heavy cooking season or after any drop, soak, or cable strain. A probe that passes both the ice water and boiling water checks on the same day is ready for normal use, while one that fails should be cleaned, reseated, retested, and then retired if it still drifts.
Can I use any probe with any thermometer base?
No. Connectors, pin counts, and rated ranges differ between designs, so a probe that does not match your base may not fit, may read incorrectly, or may not be safe at the temperatures you plan to use. Read the documentation for your base unit, note which probe types it accepts, and check the rated range before cooking. If the documentation is unclear, contact the manufacturer rather than guessing.
Is a cable probe better than a thin needle probe?
Neither is better in every case. A cable probe stays in the food and tracks temperature continuously, which suits roasts, whole birds, and long cooks. A thin needle probe gives fast readings in thin foods and leaves a small hole, which suits steaks, chops, and cutlets. Many kitchens benefit from owning one of each, then choosing based on the food's thickness and the cooking time rather than on a single favorite.